

Here you can record your transaction.
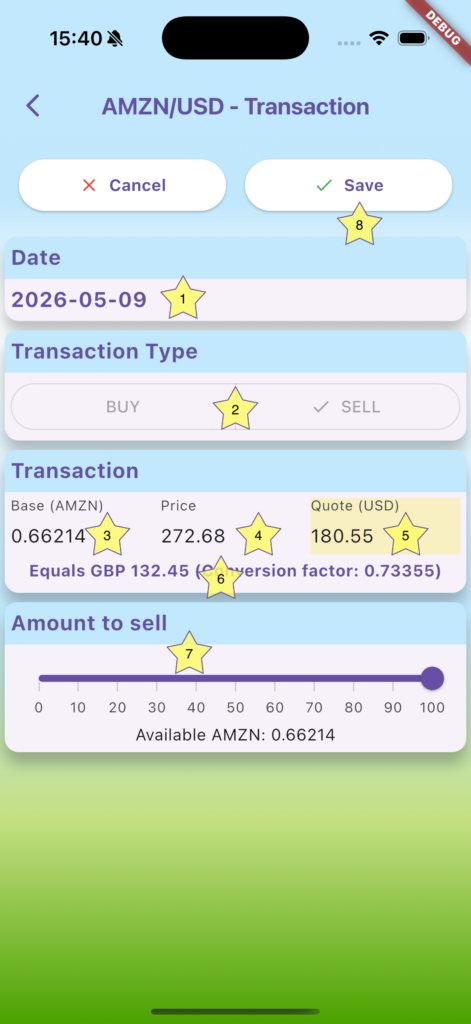
When you record the date of the transaction by tapping on the date, the app will automatically adjust the conversion rate (seen in (6)). The date selection dialog should be easy to use and self-explanatory. Select either buy or sell transaction using the Transaction Type buttons (2). Note that I entered the screen here using the ADD button in the pending sell transaction shown on the Transactions Tab help page, so it is pre-populated with the appropriate values and the buy/sell button deactivated. It will be active if you add a transaction using the the generic button at the top of the Transactions Tab.
When entering a transaction in (3), (4) or (5), the app intelligently auto-completes the other fields. The autocompleted field is indicated by the yellow background, in this case the Quote field (5). It’s best to play around with this function, to get a feel for it.
If you tap on the ‘Equals…’ text (6), you can switch the Quote field from Quote currency to your home currency and back. I found this useful when I know how much I want to invest in my home currency, and it automatically converts it (using the conversion rate according to the date you selected) into the relevant Quote currency.
Sometimes you might want to not sell all your assets, but only part of it. The ‘Amount to sell’ slider (7) will help you with selecting the correct amount.
Do not forget to save your transaction with the SAVE button (8). If you go back without doing so, or select the cancel button, your transaction will not be recorded. This is deliberate, as sometimes you may have accidentally changed something and want to leave without recording it.